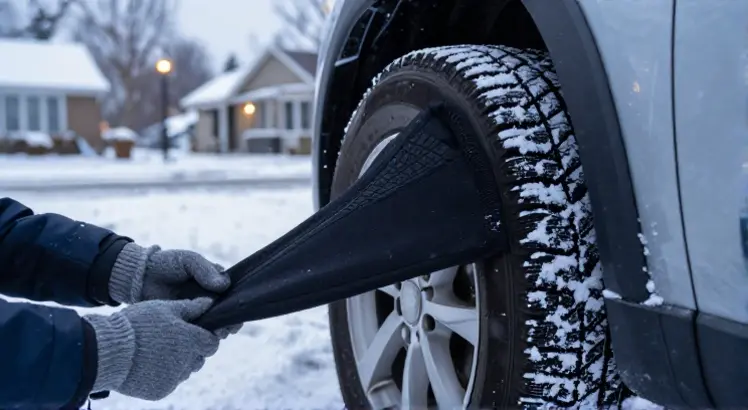
Getting stuck in snow or ice is stressful, but tire socks, often called snow socks, offer a lightweight, easy-to-install alternative to traditional chains. These fabric traction devices wrap around your drive tires to provide instant grip on packed snow and ice. If you have never used them before, the process might look tricky, but learning how to install tire socks is straightforward once you know the right technique.
This guide walks you through every step of the installation, from parking safely to final checks. You will also learn how to avoid common mistakes and how tire socks compare to other traction aids. Before you hit the road, be sure to check out our review of the best snow socks for vehicles to make sure you have the right size and type.
What Are Tire Socks and When Should You Use Them?

AutoSock for Passenger Vehicles HP697
Check PriceTire socks are made from high-strength textile fibers like polyester and aramid. They fit over the tire tread in a tight, flexible cover. Unlike metal chains, they are quiet, lightweight, and produce almost no vibration. They work best on packed snow, ice, and slush, but they are not designed for bare pavement or deep mud.
You should use them when winter weather suddenly turns severe, when local laws require traction devices, or when you need to climb a slippery hill or navigate an unplowed road. Many drivers keep a pair in the trunk along with a set of top-rated winter tires for extra confidence.
Step-by-Step Guide: How to Install Tire Socks

K&K Auto Pro Series Snow Socks XL
Check PriceInstalling tire socks takes only a few minutes per wheel once you practice. Follow these steps in order, and never rush the process. Always check the manufacturer’s instructions for your specific model, but the general method is the same.
Step 1: Park Safely and Prepare
Pull over to a flat, level spot away from traffic. Turn on your hazard lights. Engage the parking brake and turn off the engine. If you are on a slope, do not attempt installation, the vehicle could roll. Lay the tire socks out on the ground next to the wheels they will go on, usually the front wheels for front-wheel drive, the rear wheels for rear-wheel drive, and all four for all-wheel drive vehicles.
Check the socks for any damage, tears, or embedded debris. Even a small rip can widen under load. Also, confirm you have the correct size. Socks that are too large will slip, and ones that are too small will be impossible to stretch over the tire.
Step 2: Unfold and Inspect the Tire Socks
Lay each sock flat on the ground. The elasticated edges should face up. Identify the colored markers or straps that indicate the top and bottom. Most brands use a bright color on the outer edge to help you keep the sock centered. If your socks have a stretchy band, that band usually goes on the inside of the wheel, closest to the car’s suspension.
Take a moment to locate the pull-on loops or straps. These are often sewn into the fabric near the edge. You will use them to pull the sock over the tire without overstretching the material. If the socks have been stored folded, shake them out gently to remove any stiffness.
Step 3: Drape the Sock Over the Top of the Tire
Stand next to the wheel. Hold the sock with both hands and place the uppermost part of the fabric over the top of the tire. Let the sock hang down evenly on both sides. The elastic edges should sit just outside the tire shoulders. It will look like a loose cap sitting on the top third of the wheel.
Make sure the sock is centered from left to right. If the fabric is twisted, straighten it now. The top section should cover the tread from the 11 o’clock to the 1 o’clock position. This initial placement is critical because it determines how smoothly the rest of the sock will slide on.
Step 4: Pull the Sock Down and Around the Wheel
Now, firmly grip the front edge of the sock and pull it downward over the tire. Use your body weight, not just your arms, to work the fabric over the tread. As the front section comes down, the sock will naturally start to cover the sidewall. Repeat the same motion on the back side of the tire.
If you encounter resistance, do not yank the material. Instead, work the sock side to side in small increments. The high-friction fabric grips the rubber, so a slow, steady pull works best. At this point, the bottom of the tire will still be uncovered, and the sock will look like a horseshoe around the upper half of the wheel.
Step 5: Tuck the Sock Under the Tire and Finish the Fit
To install the lower portion, you need to move the vehicle slightly. Start the engine and release the parking brake. Drive forward very slowly, no more than half a wheel rotation. Immediately stop and re-engage the parking brake. This short roll brings the uncovered part of the tire to the top.
Reach down and pull the remaining fabric over the exposed tread. Tuck the inside edge securely behind the wheel. Avoid touching hot brake components. Once the sock is fully seated, check that the elastic is evenly distributed around the entire rim. The sock should be snug with no loose flaps.
Step 6: Check the Fit and Adjust
Walk around the vehicle and inspect each sock. The fabric should sit flat against the tread without any folds or twists. The inner edge must not rub against the brake lines or suspension parts. If you notice any bunching, pull the sock gently at the affected area to smooth it out.
Once satisfied, drive forward at a very low speed, under 20 mph, for a few hundred feet. Then stop and recheck the fit. The socks may settle slightly after the initial movement. Tighten any straps or reposition the fabric if needed. After this final check, you are ready to continue your drive.
Common Mistakes to Avoid When Installing Tire Socks

Goodyear Pro Snow Socks 3XL
Check PriceEven small errors can cause the socks to tear or slip off. One frequent mistake is installing them on the wrong wheels. Always put the socks on the drive wheels. If you have an all-wheel drive vehicle, install them on all four tires to prevent drivetrain stress. Another error is driving too fast. Speed limits for tire socks are usually 30 mph or less, and exceeding that can shred the fabric.
Many people also forget to remove the socks once they reach clear pavement. The abrasive texture of dry roads wears down the material quickly. Remove them as soon as you no longer need them. Finally, do not attempt to install tire socks on a hot tire after aggressive driving. The heat can damage the fibers and make the sock harder to fit.
Tire Socks vs. Snow Chains: Which Is Better for You?

Snow Socks for Tires Red Medium
Check PriceTire socks and snow chains serve the same purpose, but they feel very different behind the wheel. Chains provide maximum bite on thick ice and hardpack, but they are heavy, noisy, and can damage the wheel well if they come loose. Socks are much quieter, lighter, and faster to install, and they are gentler on your tires and suspension.
However, tire socks are not as durable as chains. They wear out faster on bare pavement and can be cut by sharp rocks. For occasional winter driving, or for drivers who want a compact, easy-to-carry solution, tire socks are a smart choice. For more extreme conditions, you might prefer chains. Knowing how to install tire socks properly allows you to get the most out of this clever traction device. For more winter safety advice, the AAA winter driving safety guide offers excellent tips on driving in snow and ice.
Frequently Asked Questions

Black XL Snow Socks for Tires
Check PriceCan I install tire socks on any type of vehicle?
Yes, tire socks are available for cars, SUVs, vans, and even some light trucks. You must choose the correct size that matches your tire’s dimensions. Always check the manufacturer’s size chart. Socks are not recommended for heavy-duty trucks or vehicles with extremely low-profile tires unless specified by the brand.
How fast can I drive with tire socks on?
Most manufacturers recommend a maximum speed of 30 mph, or 50 km/h. Driving faster can cause the socks to overheat and tear. Always read the instructions that come with your specific model. Reduce speed even further on sharp curves or uneven surfaces.
Do I need to remove tire socks when the road is clear?
Absolutely. Tire socks are designed for snow and ice, not dry pavement. Driving on bare asphalt even for a short distance will drastically shorten their lifespan. Remove them as soon as you reach a plowed, dry road. Store them in a dry bag to prevent mildew.
Can I use tire socks instead of winter tires?
Tire socks are a temporary traction aid, not a replacement for winter tires. They provide extra grip when conditions suddenly worsen, but they do not offer the same cold-weather rubber compound and tread design. For the best safety, combine them with a good set of winter tires.
How do I store tire socks after use?
After removing the socks, let them dry completely. Shake off any loose dirt or ice. Fold them neatly and place them back in their storage bag. Avoid storing them wet or crammed in a tight space, as this can degrade the fabric over time. Inspect them for damage before the next use.
Conclusion
Knowing how to install tire socks correctly can save you time, frustration, and keep you moving safely in winter weather. The key is to take your time, center the sock on the tire, and use the vehicle’s slow roll to finish the fit. Once you practice a couple of times, the whole process takes just a few minutes per wheel.
Remember to always drive slowly, avoid bare pavement, and remove the socks as soon as conditions improve. Pair them with quality winter tires and carry a set in your vehicle so you are never caught off guard. With the right technique and a little preparation, tire socks become a reliable, lightweight traction solution that you can count on all season long.